Add Timestamps as a custom dimension for Google Analytics pageviews
Google Analytics currently doesn’t provide accurate information on pageview timestamps. The best accuracy you can get for a pageview is minute. Since a visitor may visit multiple pages within a minute, you cannot get the accurate order of a visitor’s pageview sequence.
To work around with the issue, you can add timestamps as a custom dimension in Google Analytics. SkyGlue can export the timestamps together with visitor IDs in SkyGlue GA raw data export.
To do that, you need to create a “Hit” scope custom dimension in GA. See details on how to create custom dimension in GA. (The link is for visitor Id. You can replace the custom variable name as “TimeStamp” and Scope as “Hit”) . Please make sure the scope is “Hit”
You can set the value of the custom variable on every page load using one of the following approaches: By JavaScript directly or using GTM.
Approach 1: Add custom dimension by JavaScript
You can add the following JavaScript
ga('set', 'dimension1', Date.now());
on every webpage’s GA JavaScript and before
ga('send', 'pageview');
For example:
Approach 2: Add custom dimension by Google Tag Manager (GTM)
You can also add the custom dimension in Google Tag Manager (GTM).
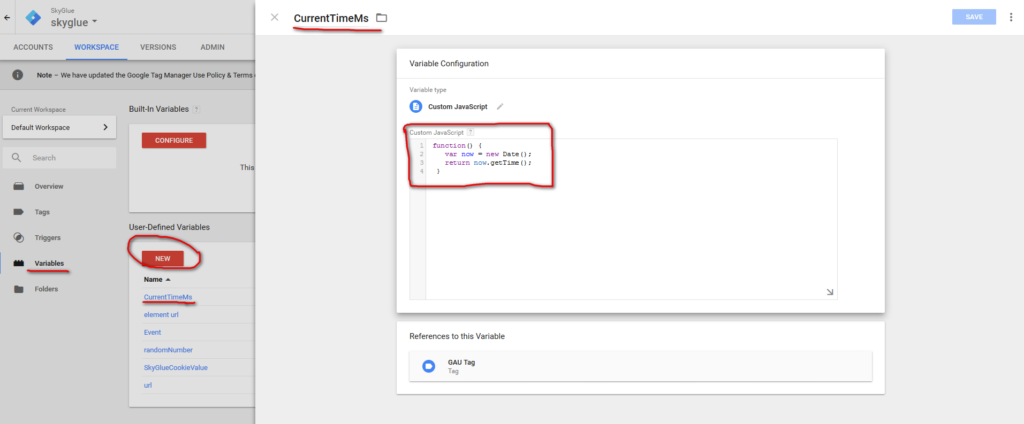
1. Create a new variable by clicking “Variables” on the left menu and then click “New”. Set a name for the variable, e.g. “CurrentTimeMs”
2. Click the circle icon in the “Variable Configuration” screen. Then choose variable type as “Page Variables” => “Custom JavaScript”
3. Use the following JavaScript as “Custom JavaScript”
function() {
  var now = new Date();
  return now.getTime();
}
4. Click “Save” to save the user-defined variable.
Following screenshot shows the custom variable:
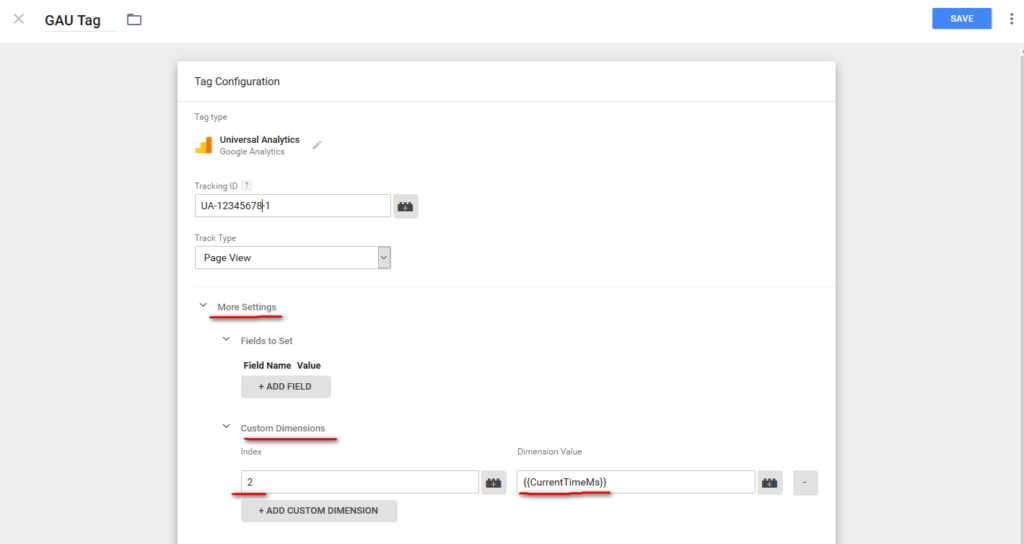
5. Edit the Google universal analytics tag.
Select “More Settings” => “Custom Dimensiions” => Click “+ Add Custom Dimension”
Set the index to the index number you created in Google Analytics, e.g. 2 (Please make sure the index you created in GA is “Hit” scope.)
For “Dimension Value”, click the “+” icon next to the text box, then choose the custom variable created earlier (e.g. “CurrentTimeMs”). GTM should set the text as “{{CurrentTimeMs}}”.
Following is the screenshot
6. Save the updated tag.
7. Publish the updated tag.