Salesforce Integration Details
Steps to set up Google Analytics and Salesforce integration using SkyGlue
1. Create user ID fields in Salesforce
1) Click "Setup" (in the user name dropdown list at the upper right corner)=>"Customize"=>"Leads"=>"Fields".
2) Click "New", choose "Data Type" as "Text". Click "Next". Enter "Field Label" (This value will not be used since we will use hidden field. Sample value: "Visitor ID".), "Length" (enter "30") and "Field Name" (for the field to show Salesforce. Sample value "sg_a_id" or "sg_r_id" for anonymous user Id or registered visitor Id.). Click "Next".
3) You can set who can see the field in the next screen (Step 3. Establish field-level security). Seeing the value of this field will enable you to see if record is a online visitor and decide if you want to see the visitor's online behavior. Please enable visibility of the field to users who need to see online visitor behavior.
4) click "Next" and then "Save".
Now you have created the SkyGlue user Id field. Click on the field to see the detail you configured. You can also look at the URL to get the field ID. For example if the URL is "https://na10.salesforce.com/00NF000000BqABC?setupid=LeadFields", the field Id is 00NF000000BqABC.
2. Add the user Id field as a hidden field in the Salesforce web-to-lead form.
(If you already have a web-to-lead form and just want to add SkyGlue Id to the form, you can follow the steps, but just need to add the hidden field to your web form)
1) Click "Setup" (in the user name dropdown list at the upper right corner)=>"Customize"=>"Leads"=>"Web-to-Lead".
2) Click "Create Web-to-Lead Form". In the next screen, add the SkyGlue ID field to the form, in addition to other fields you need. Configure the "Return URL" and click "Generate".
3) In the form code generated, replace the SkyGlue Id with hidden field. For example, the generated code as the following:
SkyGlue A Id:
Should be replaced as
or
You can set the value as either #sg_a_id# (SkyGlue anonymous user ID) or #sg_r_id# (SkyGlue registered user ID). SKyGlue will automatically replace these values with Id or each visitor. You can see more detail on SkyGlue visitor ID here: SkyGlue anonymous and registered visitor Id
4) Add the form code to the website.
3. Create SkyGlue custom link for individual visitors
1) Click "Setup" (in the user name dropdown list at the upper right corner)=>"Customize"=>"Leads"=>"Buttons, Links, and Actions".
2) Click "New Button or Link" button.
3) Enter Label and Name (e.g. "SkyGlue Link" and "SkyGlue_Link"). Select "Display Type" as "Detail Page Link". In "Behavior" dropdown list, choose "Display in new window" and in "Content Source" dropdown list, choose "URL".
4) In the text area below, enter the user report URL. You can get sample URL for individual anonymous visitor by clicking any visitor in your SkyGlue portal.
You need to append "&iframe=true" to the URL to avoid showing SkyGlue menus in the user report.
A. For anonymous visitor Id, the sample URL is
https://app.skyglue.com/reports/user_report_drilldown/?user_id=140531184645291&iframe=true
The user_Id should be replaced with Salesforce field value, e.g. . You can select the SkyGlue anonymous visitor Id field from the "Insert Field" dropdown list above to insert the field value automatically in the URL
The sample completed URL after replacement is:
https://app.skyglue.com/reports/user_report_drilldown/?user_id=&iframe=true
B. For registered user Id, the sample URL is
http://app.skyglue.com/reports/user_report_drilldown/?registered_id=234&iframe=true
The registered_id should be replaced with Salesforce field value, e.g. . You can select the SkyGlue registered user Id field from the "Insert Field" dropdown list above to insert the field value automatically in the URL.
The other values should be replace according the instruction above for the anonymous visitor Id.
The sample completed URL after replacement is:
http://app.skyglue.com/reports/user_report_drilldown/?registered_id=&iframe=true
5) Click on "Save" to generate the custom link.
4. Add SkyGlue custom link in Salesforce lead layout
The SkyGlue Id should be in your lead layout after you set visibility when you create the SkyGlue Id field. If you want to edit the layout, you can do the following:
1) Click "Setup" (in the user name dropdown list at the upper right corner)=>"Customize"=>"Leads"=>"Page Layout".
2) Click "Edit" on the Lead layout and edit the layout.
3) Choose "Custom Links" in the list. Drag the link you created in the step above to your desired location in the "Custom Links" field.
4) Click "Save" button.
Now you should be able to see the SkyGlue links in your lead layout. Test it out and enjoy!
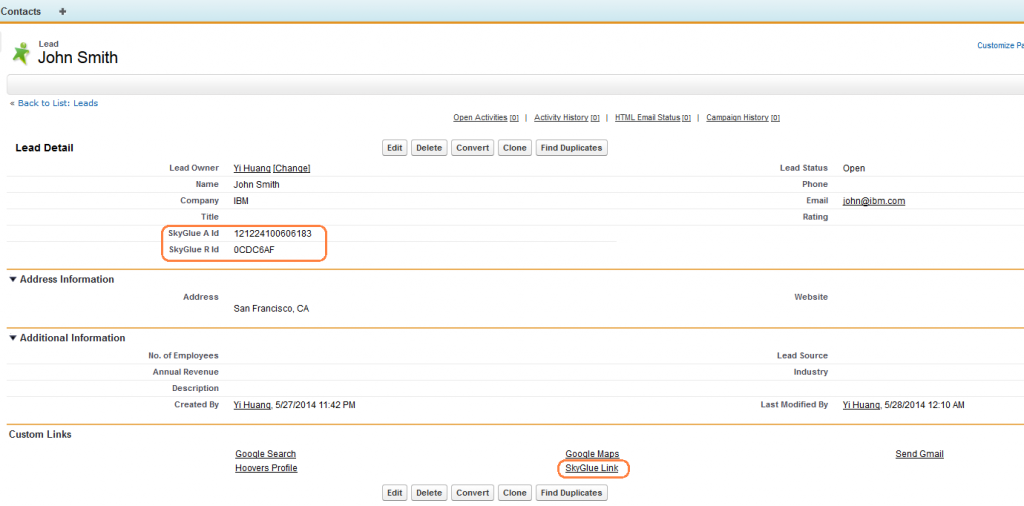
Below is a screenshot after the final integration:
Please contact [email protected] if you have any questions with this integration.